Showing posts with label crochet. Show all posts

Monday, December 31, 2012

Carpet Bookmarks

One of the vendors at Costume College (in 2011) had these carpet bookmarks. I'm not actually sure why they had them, but I happily picked up a few of the designs.


Below Germaine and Stephanie model some dresses on one of the carpets.


I decided at some point that I should put together a workbook of crocheted clothing for Sylvanian Family figures. These two dresses were probably the start of that idea. The plan is to have increasing levels of difficulty, from a fairly simple dress in size 10 crochet thread down to items in size 80 thread or single strands of floss. I have some of the patterns figured out, but I haven't gotten around to writing them up nicely yet. You can follow some of the progress on Ravelry: Workbook Test Dresses.

Friday, November 26, 2010

Basket and Bread

Almost two years ago, while I was reading various articles and books about miniatures I came across some suggestions for using linen floss to make miniature baskets. I think this flower basket was one of the articles I read. In any case, I picked up the burgundy, brown, and green DMC linen floss from my local Michaels. Unfortunately I think those may have been the only colors they had, and they were never restocked. I never got around to following the woven basket instructions, but at some point I came across a cute little crochet basket by Pierrot (Ravelry link). Rather than using the suggested yarn, I used a single strand of the DMC linen floss, and a 0.9mm hook (US size 12 or 14). The basket could stand to be blocked, but I think the scale was approximately correct.

Cinnamon Hawthorne carrying a basket of bread:

The bread and the rolls in the basket were the result of reading various instructions and watching some number of YouTube videos about polymer clay food. In particular, this rather detailed video tutorial on bread. Since making the bread and rolls, and realizing I lacked useful powder colors to accent polymer clay food, I've collected a few more powders that looked like they would be useful, but I haven't tried them yet.

Friday, November 5, 2010

Crochet Slippers for Sylvanian Family Baby

Well, I've mostly been keeping my posts in order, but I wanted to make the slipper pattern available. I went back and double checked my hastily sketched diagram, that I mentioned in The Slipper Project, to make sure it was correct. Luckily it was. On my first test, however, I misread my own pattern. Oops. So I went back and made a second pair, using three colors instead of my standard two for illustration purposes. Here's the initial diagram, and one of the original pair of shoes (in peach) along with the two new pairs created during the pattern test:

The slipper is constructed in three parts: a sole, the shoe sides, and the upper toe. The sole begins with a line of chain stitches, then works in rounds to make an oval: shown in medium blue.
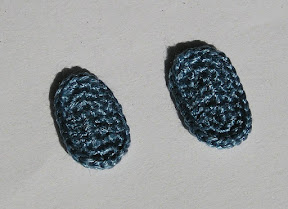
The sides consist of three rows of single crochet stitches: shown in yellow.
Finally, the upper toe consists of two rows covering one end of the oval: shown in light blue.

After checking my initial pattern, I went and wrote up the instructions nicely. Here's a picture of the new chart:

Complete instructions, both written out row by row (using ch, sc, and dc) and charted with an explanation of the symbols, can be downloaded via GoogleDocs or Ravelry .

Pictures of the shoes on one of the baby grunts:

Wednesday, October 6, 2010

The Slipper Project

One of the Sylvanian Family marketplaces is a shoe shop, and some of the available outfits also come with shoes. I don't recall ever seeing shoes for them when I was younger, but I did try and sew my own slippers and shoes back then. They were pretty poor attempts however.

Inspired by "Crochet Moccasin Slippers" by Sue and "Baby Mary Jane Skimmers" by Sylvia Heddwyn, I decided to try making a pair of slippers with my size 14 hook and embroidery floss.
Tiny - Slipper SideTiny - Slipper Top
The sole was crocheted with two strands of floss, and the sides and top were crocheted with one strand of floss. (link to Ravelry project)

Based on the success of the first pair of slippers, I decided all my Sylvanian Families needed new shoes. So I started "The Slipper Project". So far I have completed two additional pairs of slippers, and Coral now has shoes to match her dress:
Coral's new shoes


I made these based on a pattern diagram I quickly sketched out on some paper. I need to double check that I didn't make modifications after the initial diagram, and then I plan to post the pattern.

Friday, September 10, 2010

Crochet Hooks for Fine Threads

I mentioned in the prior post that I picked up some crochet hooks along with the knitting needles, which means I can now crochet with a single strand of embroidery floss. One of the patterns in my Ravelry queue was "Cindy" by Helga, so I decided to modify the dress to fit Coral.
Left sidebackride side front
The bottom edging was "Tiny Treasures 8-130" from Traditional Edgings to Crochet by Rita Weiss [GoogleBooks,B&N,Amazon]. Rather than a belt, a small tatted edging is attached around the waist. Other changes and details are on Ravelry.

Thursday, August 26, 2010

Clothing: A Different Approach

I joined Ravelry at some point in 2008, and rather quickly became entranced with the doll group. Well, my 'dolls' have always been Sylvanian Families (or stuffed animals), and crocheting them some clothing sounded like fun. My thought at the time was something like "they're so small, it'll be fast."

I found out that Kelly doll patterns are sized somewhere in between a kid and an adult Sylvanian Family member. (At least, that's what I recall.) So I started with Wendy Squires's pattern for a 'Ruffle Tank Top', and of course modified it in all sorts of ways to make it fit. Here is "Quick Rewards, #1", as I have called the project on Ravelry:
Holly in a seafoam green dress.
It was made in a size 10 thread with a 1.5mm crochet hook. I couldn't figure out how to close the back for the longest time. Then eventually I decided to make a chinese button knot. I found instructions on Chinese Knotting, and after numerous practice attempts with larger cord and many failed attempts with the size 10 thread, I eventually managed to create a button knot closure.
Chinese Button Knot Closure Button Knot up close.


The first dress went together so fast I moved onto "Quick Rewards, #2", an outfit for Fern Timbertop. I used Wendy Squires's "Victorian-Style Outfit", and again modified it. This time, however, I kept track of my modifications (more or less); they're written up in my project notes on Ravelry.
Fern Timbertop in Quick Reward #2


For "Quick Reward's, #3" I decided to try knitting instead of crochet. I pulled out the smallest needles I had (at the time), 000 (3-0), and some DMC Perle 12 thread, and attempted to make a pair of underwear using "Undies for Barbie" with the usual modification creativity for fit. Modifications are again listed in my project notes, but I was starting to keep better track of specifics by this point so they may actually be complete enough to duplicate this.
Sandy in underwear
I concluded from this project that I needed smaller needles, and I needed to use finer thread.